For the last few months we’ve been working hard on a new invention here at Viaboxx Systems, and now we think it’s time to tell the world about our recent accomplishments.
A lot of the stuff we do at work goes into creating GUIs for touch-screens, like the ones you find on ticket-machines and ATMs. One of our most favorite domains is creating frontends for parcel delivery machines, like the ones you see featured on viaboxx.de.
We used to do the GUI-bits of our software using Adobe Flash or Flex for many years, but we had our fair share of problems with this.
Flex was good at creating an attractive and snappy interface well suited for (single) touch-screens, but was cumbersome to develop and maintain.
Much of the user state and business logic was contained in the Flex layer, which again was tricky to test automatically and debug.
Now, as Flash is slowly dying, we decided it was about time to try something different. And the only real option for us was to try doing something with HTML5 and JavaScript, in a so-called single-page application.
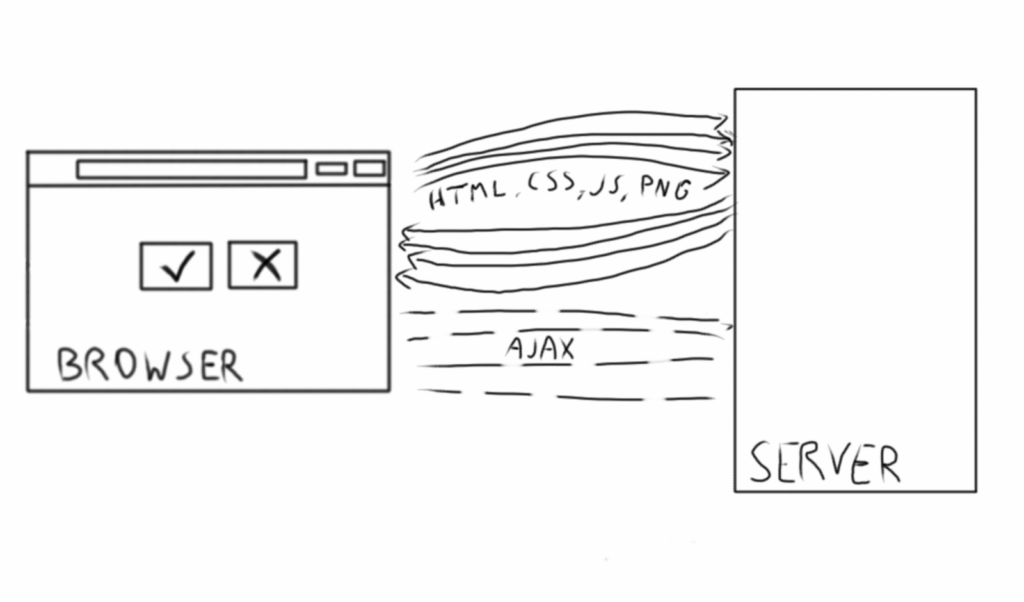
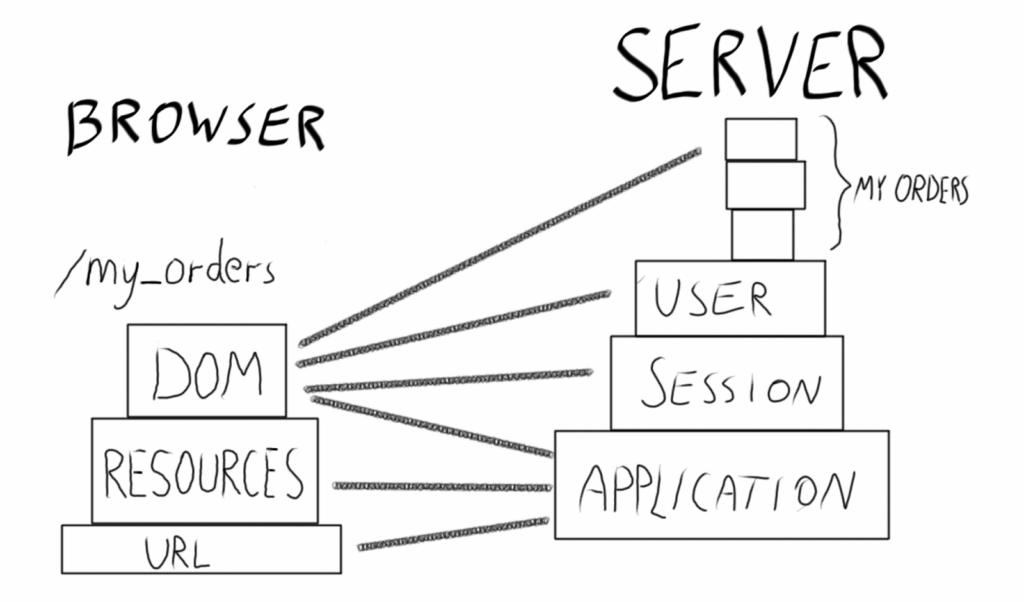
Typical Web applications rely on gradually building a session, following a given navigational path to end up in a given state. For example, to see what the „My Orders“ page looks like, you need to log in and click on the link.
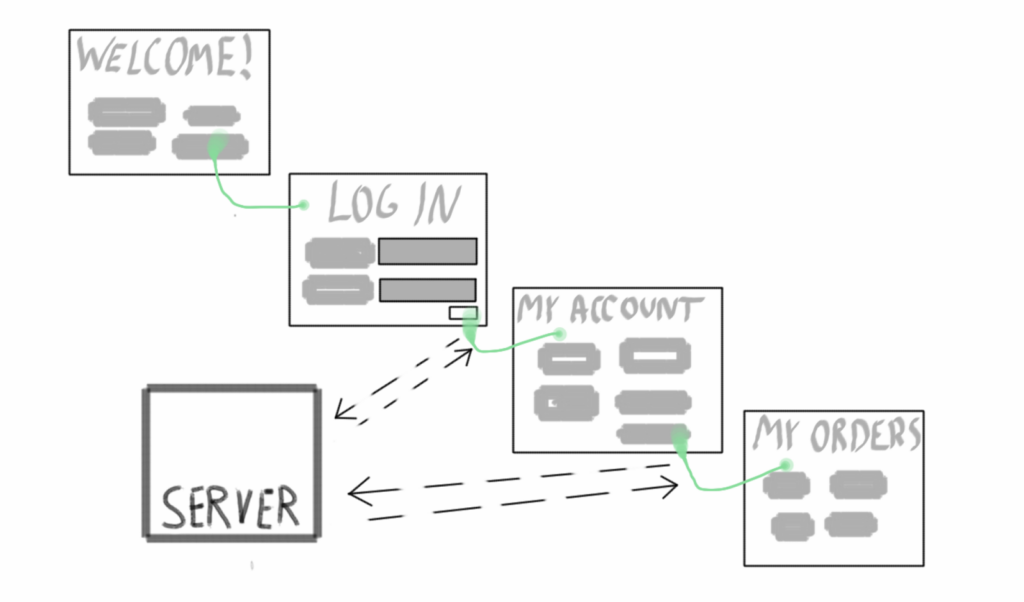
You need to have the right state in both client and serve to display the „My Orders“ page properly.
This pattern has given us (and probably many others) a lot of headache over the years. Too much state and logic on the client side allows for GUI bugs that are hard to replicate.
Testing and debugging on the client side also tends to be below-par of what we can do with server-side code.
What we have done is to remove virtually all state on the client. All logic is on the server side.
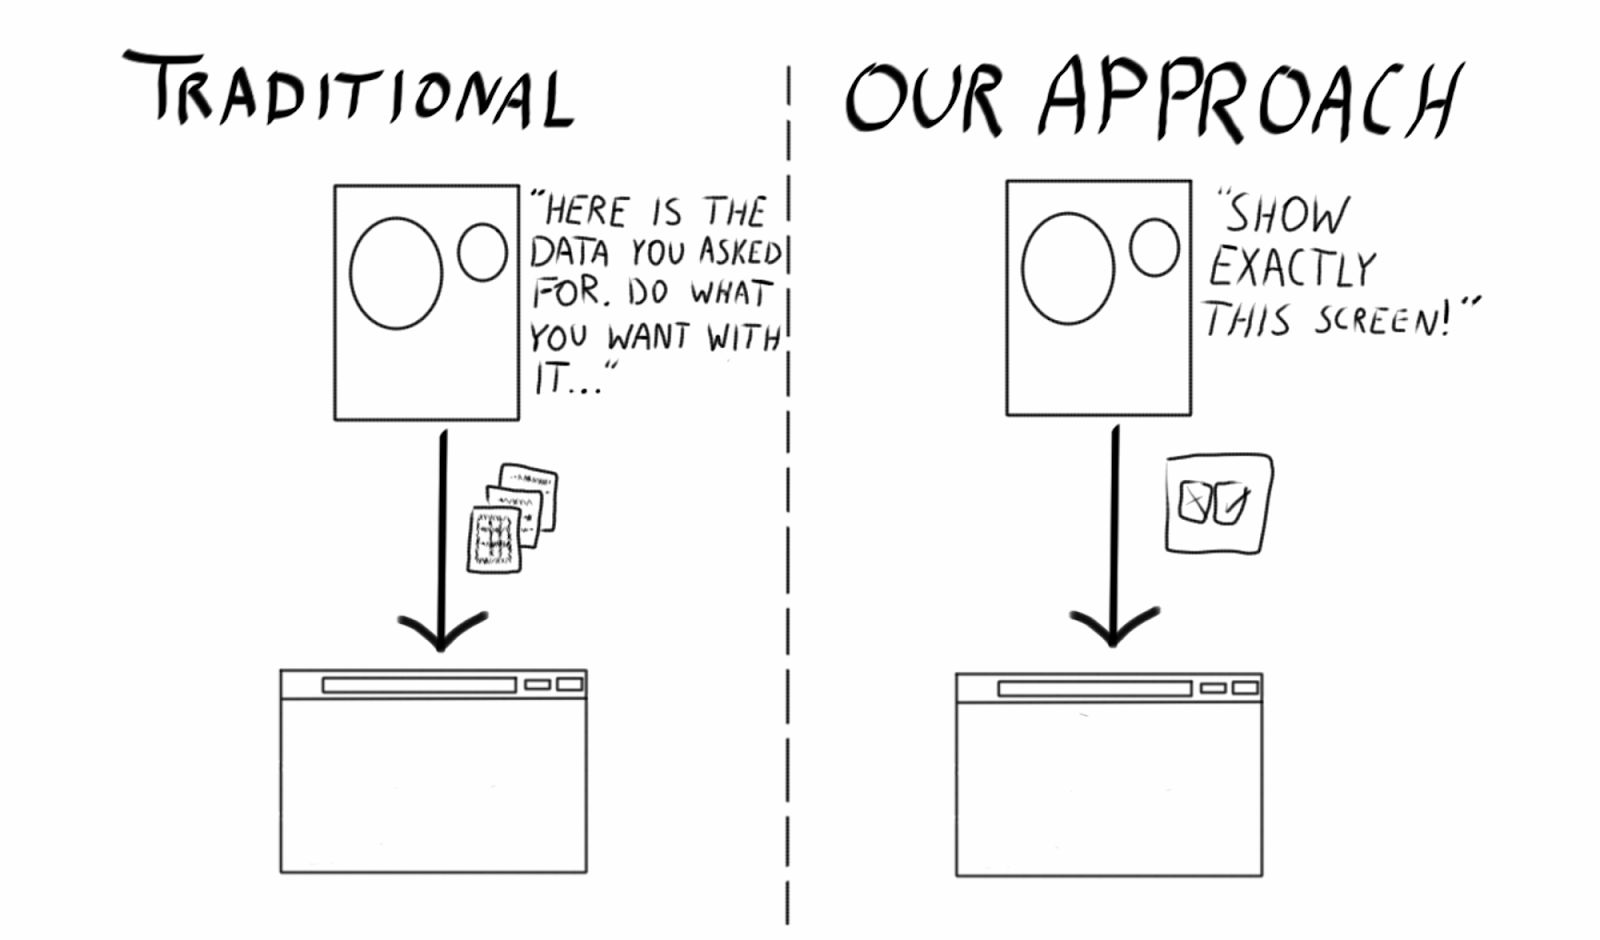
Every button clicked in the client typically results in a round-trip to the server, where a state machine is told what the user did, then spits back a new screen for the client to render.
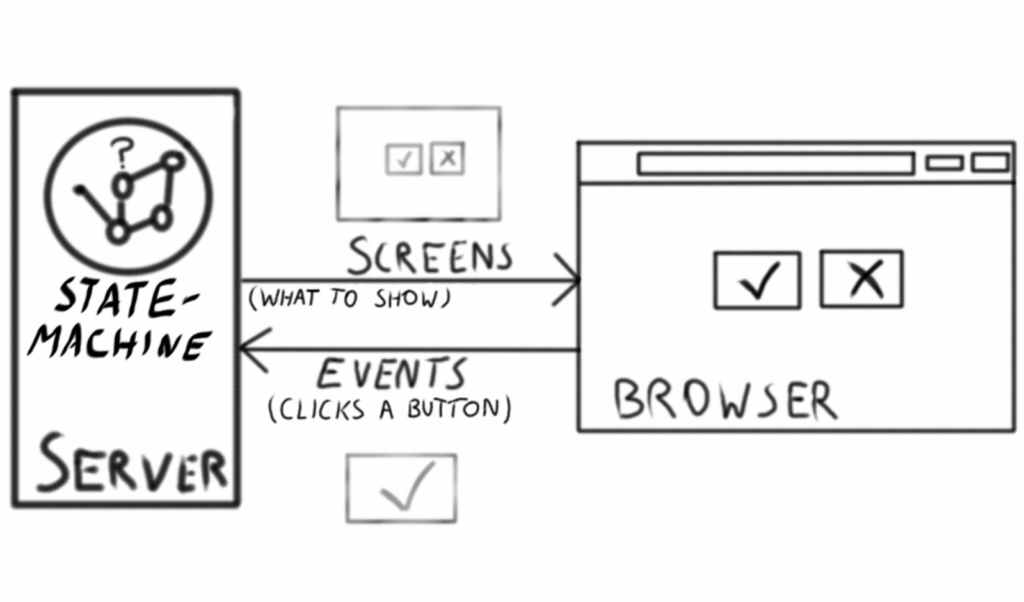
The mechanics of the statemachine is also very interesting, but we’ll come back to that in another blog post.
This round-trip may sound slow for a touch screen that should be fast and responsive, but it works well for four reasons:
1) Server is running on the actual same machine (PC) as a client/browser
2) We use WebSockets, so events from the server have an immediate effect on the client.
3) Some smart caching and JavaScript to update the page quickly.
4) We have very simple screens with small payloads.
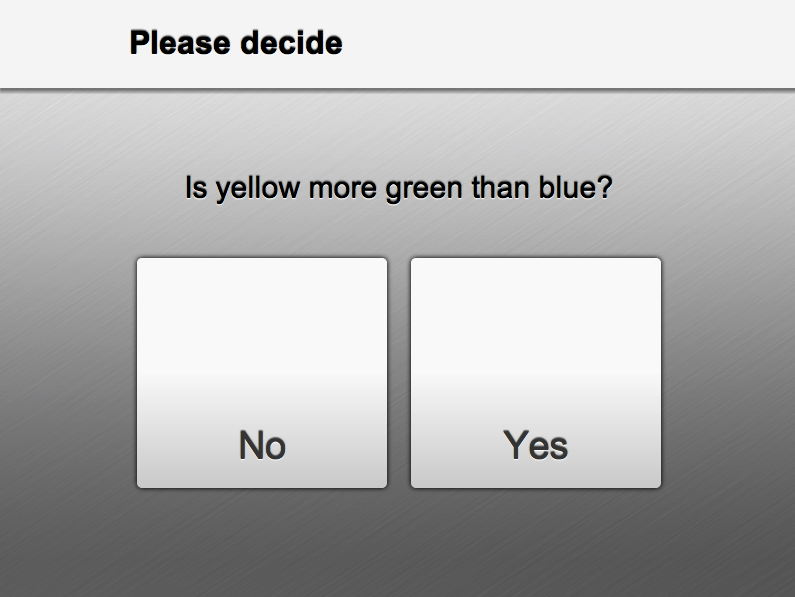
So what does one of these screens actually look like? Here’s an example:
[codesyntax lang="javascript"]
"decision": {
"def": {
"headline": "Please decide",
"question": "Is yellow more green than blue?",
"type": "decision"
"events": [
{
"id": "yes",
"text": "Yes"
},
{
"id": "no",
"text": "No"
}
],
}
}
[/codesyntax]
Pure JSON that represents the entire state needed to display a screen to the user.
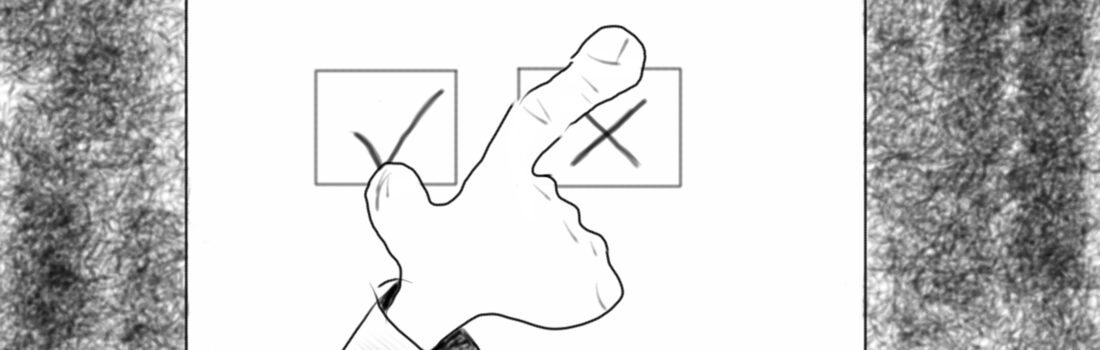
This JSON is sent to the browser, it gets run through a generator (Mustache) which turns it into HTML, and then we quickly “swap” the new screen into the visible window. After a little styling it up with CSS, it looks like this:
It is really great to have this loose coupling between what the user sees, and what the server knows. Let’s see why.
Advantages of this setup?
Doing web design without having to click around in the application
You don’t have to work the server side into the right state for doing some web design on a particular page. You only need a snippet of JSON (as the one mentioned earlier).
Here I’ll demo our little screen-IDE. It runs on a local little Node Server, and turns JSON into visible screens on the fly:
You can choose from a prepared set of JSON examples, or you can copy/paste in screens from the log files, and then you can adjust the contents by hand to get the condition you want to see.
This provides immediate feedback to the web designer. After changing CSS (or LESS which we actually use), Mustache-template or JavaScript we only need to refresh the browser to see the latest content. We can also simulate some simple server-side events by passing some JavaScript to Node (look for the Script panel around 0:36 in the video above).
Test the GUI in any way possible
Traditionally, there are many disadvantages to test the application using the GUI, but many developers do it anyway because they have no other way to test the GUI, and they can’t run the GUI without the rest of the application.
In our setup, we can for example test that…
* correct screen object is produced by the state machine (pure unit-test)
* expected JSON is produced from the given screen (pure unit-test)
* correct HTML is produced from given JSON (for this we need a browser with a JavaScript runtime, but it can be headless, like PhantomJS)
* HTML from a screen looks OK (taking screenshots using PhantomJS)
* HTML from a screen looks just right (this requires the use of a production browser on the production operating system, and taking screenshots with Selenium/WebDriver)
We combine all of these for creating tests with different intentions: we have a lot of the ones closer to the top, and fewer of those further down the list because they are more expensive in terms of resources, and they break easily.
The magic in this mix is that we are able to distinguish between (a) the right content (screens) coming from the server, and (b) the given screen looking correct in the client. This division allows us to keep our tests incredibly fast: The state machines and the screens are exercised by pure unit tests, while various browser tests create screenshots for given screens.
We can also test larger parts of the stack together, or in phases. We do the latter when we generate documentation and screenshots based on our story-tests (but we mock out hardware and remote services):
– Story-tests generate documentation with embedded JSON which will be replaced with real screenshots
– The documentation is piped through a script, where the JSON is rendered into real screenshots
It’s all incredibly fast, and we don’t have to fire up a real JVM application server – we can just do the screen rendering in the Node simulator.
See exactly what the user saw on-screen at a given time
Let’s envision this scenario: Someone delivers a package to a machine, entering the phone number for those who should receive the pickup code on a text message. Then the recipient comes by later, enters the pickup code, and takes their package.:
Since we log most of the things going on in a machine, including the screens that are sent, it should be easy to parse the log file for a sequence of screens that occurred on the machine for a given time, and then play it back again.
So we did just that, and after a few days of development we had created Sherlog:
Not only can we fast-forward and backward through the user’s experience at any pace, we can also copy the screens out of here and then work with them in the simulator if we find a GUI bug or something we want to improve on.
It did not take much code to achieve this: a log parser and a little JavaScript. The neat timeline widget is created using this Timeline library.
We can’t see where the user touches the screen yet, but we are working on that too.
Looking at Sherlog, you might be thinking that this feels a bit like Event Sourcing. Usually, Event Sourcing is used for events in the domain layer, for things like package tracking and logistics, but it is certainly incredibly powerful to use events to drive the GUI as well.
Conclusion
We do not believe that this architecture is suitable for all applications, but we’ve been playing with the idea of using it on proper web applications, especially where there is interaction in the shape of a wizard or something similar to what we’ve got on our machines.
Moreover, it is incredibly fun to work with this technology stack. There is hardly a sprint gone by where we aren’t amazed at what we have produced, and how easy it was to get it working.
We hope that this will inspire someone out there to try out something similar, and stay tuned for further blog posts about our architecture.