Here at Viaboxx we are using the ELK Stack (Elasticsearch, Logstash and Kibana) to have a centralised but scalable logging infrastructure. In this blog you will learn how to use this stack to easily have a heat map for geo coordinates.
Context
In our software we are using the Logstash-Logback encoder to directly have JSON logs ready for logstash. Those are either directly send to Logstash (behind a Redis queue) or saved to a file and send via the Logstash-Forwarder, depending on the infrastructure and firewalls.
Those logs are then preprocessed in Logstash and stored in the Elasticsearch document store. We are using the new Kibana 4 web interface to allow searching through the logs of all hosts or visualise log metrics.
One of our products is a route optimizer, which uses geodata for tour optimization. Kibana 4 provides a heatmap visualization right out of the box, one just needs to have the data prepared for it to work.
If you don’t have the geodata already in Elasticsearch, don’t hesitate! If you have the ELK stack and you have a CSV files of geolocations you can generate your heatmap in a few lines of code.
Tutorial
Let’s say you have a simple CSV ‘test.csv’ with just latitudes and longitudes, the heatmap should indicate how often a geolocation was found in the data (within a distance).
[codesyntax lang="text"]
#Latitude, Longitude
50.98474812, 7.47645034
50.98474812, 7.47645034
50.98474812, 7.47645034
50.62703234,7.74493172
50.96807514, 6.99762216
50.78432438,7.64722746
51.13014686,7.01966161
50.55503241,6.56177651
50.68262437,7.5592885
50.59502431,6.46768414
50.59502431,6.46768414
50.55442372,7.60962654
50.66100656,6.45276664
50.66100656,6.45276664
51.05079311,6.77458391
50.93658508,6.70941164
50.50670651,6.69422478
[/codesyntax]
We will process this data with a small Logstash configuration, which stores the data into Elasticsearch. Kibana 4 does not directly visualise the latitude and longitude of a document, but requires a geohash instead (nicely described in this documentation). This geohash needs to be mapped in advance before storing data.
At first, we will create the index in Elasticsearch and define the geohash mapping. Let’s name the index “geostore” and the document will be named “locality” with a property named “location“. We will assume the you are on the ELK host and are using the default ports (maybe you have it run locally via Docker).
$ curl -XPUT 'http://localhost:9200/geostore'
$ curl -XPUT 'http://localhost:9200/geostore/_mapping/locality' -d '
{
   "locality" : {
       "properties" : {
              "location" : {
                  "type" : "geo_point",
                  "geohash_prefix":     true,
                  "geohash_precision":  "1km"
              }
          }
       }
}'
This mapping of location defines that it is of type geo_point, and it defines the precision of the geohash. If you want to have a finer or coarse comparison, change this value accordingly to your needs.
If later you need to restart configuring the mapping, delete the index and start again. This is the easiest way in this example, don’t do this in production. This command deletes the index:
$ curl -XDELETE 'http://localhost:9200/geostore'
Now that we have the Elasticsearch index ready, we can configure Logstash to directly store the data of the “test.csv” into the “geostore” index.
This is the config (named “geostore.conf“) required for our Logstash setup:
[codesyntax lang="text"]
input {
    stdin {}
}
filter {
  # Step 1, drop the csv header line
  if [message] =~ /^#/ {
    drop {}
  }

  # Step 2, split latitude and longitude
  csv {
    separator => ','
    columns => [ 'lat', 'lon' ]
  }

  # Step 3
  # move lat and lon into location object
  # for defined geo_point type in ES
  mutate {
    rename => [ "lat", "[location][lat]", "lon", "[location][lon]" ]
  }
}
output {
  elasticsearch {
    host => 'localhost'
    index => 'geostore'
    document_type  => "locality"
    flush_size => 1000
    protocol => 'http'
  }
}
[/codesyntax]
This will parse the csv (given as standard input), drop the header line and parse the latitude and longitude values.
The mutate moves lat and lon into the location object that we have predefined to be a geo_type. This is the most important line, as this is already the correct structure that Elasticsearch and Kibana 4 expect.
On the host, with Logstash just execute:
$ cat test.csv | /opt/logstash/bin/logstash -f geostore.conf
This will take a few seconds to startup logstash, parse the input and store the result into Elasticsearch.
Now that we have the data in Elasticsearch, let’s move to Kibana 4. After logged into Kibana, you need to add the index to Kibana.
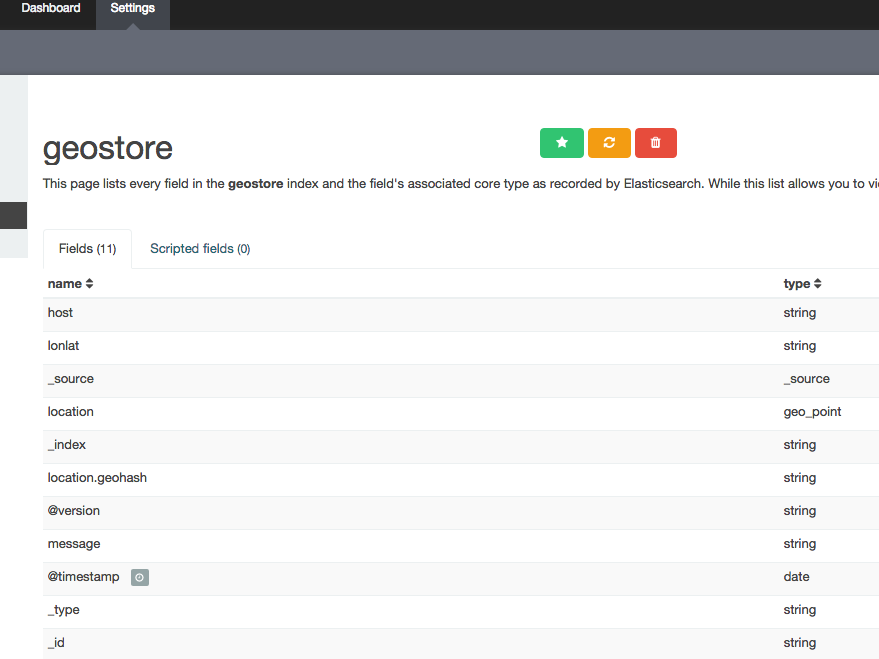
Go to: Settings -> Indices -> Add New -> Write “geostore” in the index name field.
After you add the index, you’ll see all fields in the documents of the index, especially you should check if the property location is classified as geo_point.
Now we are nearly done, go to Visualize -> Tile map -> From a new search -> Select “geostore” index.
The default value as metric is count, this counts how often a geohash is counted in the index with the given time interval.
Select as bucket type “Geo coordinates” and then already geohash should be selected as aggregation and location as field. The default visualisation for a Tile map is a circled view. As we want to have a heatmap, select “options” and change the map type to “heatmap“. After pressing “Apply changes” you will already see the map and can zoom in to see the different locations as a heat map! Congratulations!
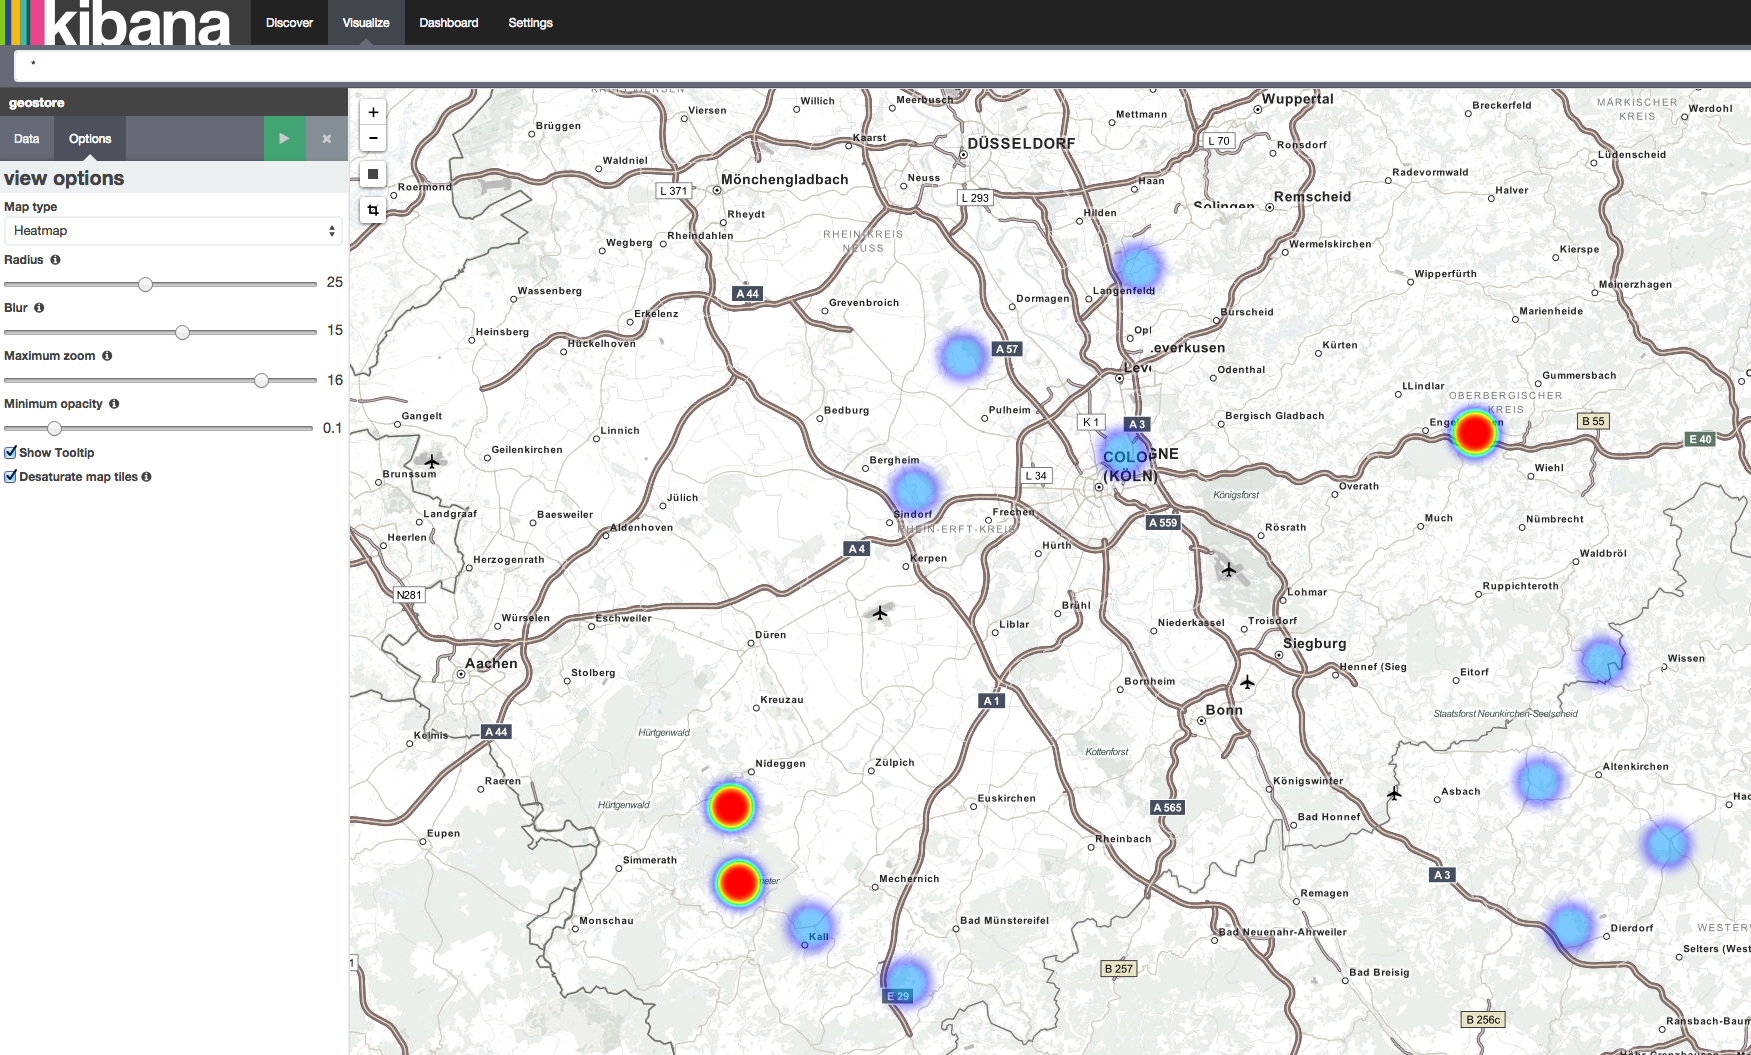
If you don’t see the data, make sure the change the time interval that Kibana uses for its query (on the top right). The default is 15 minutes into the past. Depending on when you imported the data into Elasticsearch. This feature really shines if you have geo locations in your production data and for example want to see which areas where the focus of deliveries in the last week.
hi,
can we convert “geo_point” at the time of import,
this is my sample code
mutate { convert => { “lon” => “float” } }
mutate { convert => { “lat” => “float” } }
mutate { convert => { “location” => “geo_point” } }
mutate { rename => [ “lon”, “[location][lon]”, “lat”, “[location][lat]” ] }
How to change property type in conf file?
Hi,
you should not need to change the property of lat/lon. As you rename lat/lon to be elements of the location (which is a geo_point) this should be working as is.
If you take a look at the Elasticsearch documentation for geo_point you see that you have four methods of settings the latitude and longitude:
https://www.elastic.co/guide/en/elasticsearch/reference/current/geo-point.html#geo-point
– Geo-point expressed as an object, with lat and lon keys.
– Geo-point expressed as a string with the format: “lat,lon”.
– Geo-point expressed as a geohash.
– Geo-point expressed as an array with the format: [ lon, lat]
If you still do it as lon/lat fields of the location object, you can also explicitly set lat/lon as floats. In the blog post this is set implicitly, because the inputs are already valid float numbers due to the CSV import.